Learn How to Take Telephone Line Diagnostic Readings
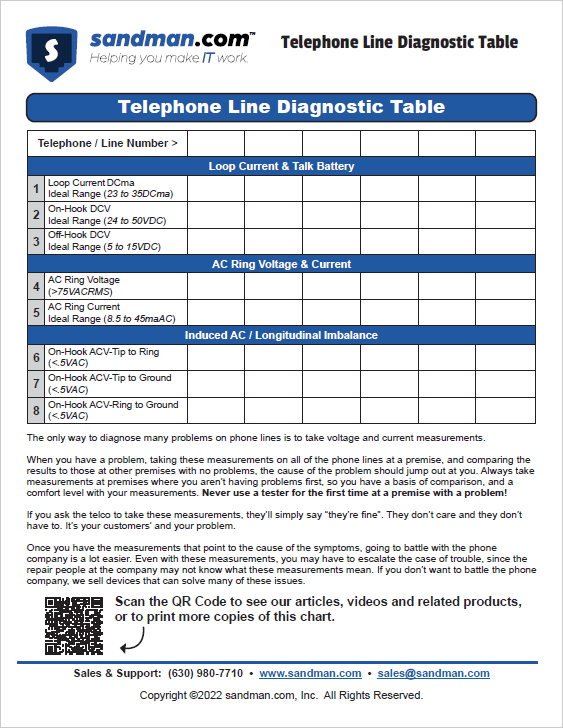
In this article we will discuss how to take the measurements on our Telephone Line Diagnostic Table. We get calls all the time asking how to measure Loop Current and Ring Voltage. Taking these measurements will help you troubleshoot the most common issues on phone lines, and help us recommend the best solution for your issue.

You will need a multi-meter to take some of these measurements. The most common meters today are called digital volt ohm meters or DVOMs. Make sure your meter can do both AC and DC voltages and has a DC milliamp scale. An analog meter (except one specifically designed for telephone work) will usually not give you correct readings.
Since a phone line has both AC and DC voltages on it at the same time, you will want to make sure your DVOM is a decent quality meter, or it may give you inaccurate readings. You will also need a Butt-set or an analog phone to take the line off-hook to take some of the readings.
Print out a copy of our Telephone Line Diagnostic Table and write down the readings as you take them for the lines having issues. You'll always want to take the first 3 readings, and the 4th and 5th if you're experiencing issues with ringing specifically.
We have a 14 minute training video showing how to take all of these readings. If you prefer reading... read on...
Let's start at the top of our Telephone Line Diagnostic Table and work our way down:
1) Loop Current DCma (Normally 23 to 35DCma)
To measure this, you will need to set your meter to DC and the milliamp (ma) scale. Make sure your probes are in the correct position (Common and Milliamps).
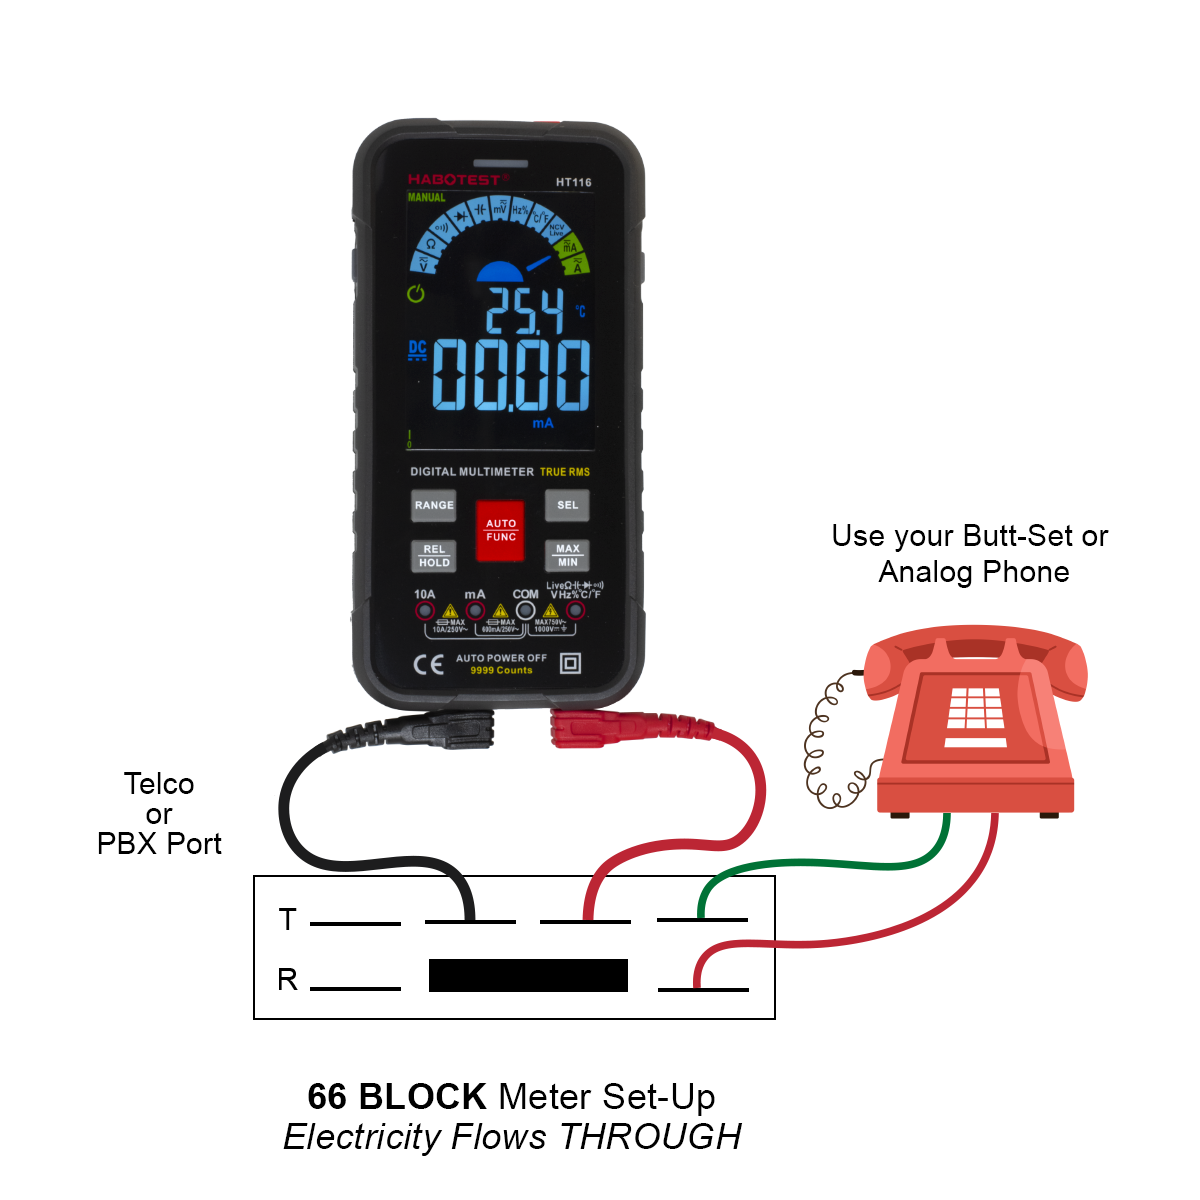
To measure Loop Current, you need the meter in-series with the telephone line and the telephone. You can do this at the 66 block, the wall jack, or just about anywhere you can access the line.
To measure at the 66 block, you will have to remove one of the bridging clips and connect one meter lead towards the CO, and the other towards the equipment. It doesn’t matter which color lead goes where since the meter will display a + or -. Put your butt-set in parallel (one lead on tip and one lead on ring) on the equipment side of the 66 block. Switch your butt-set to off-hook or talk and read the measurement on the meter's display.

If you want to take the Loop Current measurement at the wall jack, the easiest way to do this is with our Loop Current Tester #TOH7O . You can also use your meter. You will need to make a little adapter cable with a mod plug on one end and blunt on the other. Plug the mod cord into the wall jack, then connect one lead from your meter (red) to the tip side of the line. Next connect one lead from your butt-set (black) to the other lead of the meter (black), then connect the other lead from your butt-set (red) to the ring side of the line. Connecting it this way allows the current to flow through the meter (in series) so you can get an accurate reading. Once you have it connected properly flip your butt-set to off-hook or talk and read the display on your meter.
2) On-Hook DCV (Normally 24-50VDC)
To measure this, make sure that your meter is set to DC Volts and that your probes are in the right position. (Common and Volts) Depending on the type of meter you have you will have to turn a dial or press a button to switch from AC to DC.
Next, set the range on your meter. You may have to turn a dial or press a button to set it the range correctly.
Now that your meter is set up properly, place the probes on tip and ring and read the display on the meter. To access the tip and ring, you may have to make your own adaptor or remove the wall jack from the wall to access the screw terminals. You can also use a Butt-Set Banjo Adapter for easier access. You will want to have a butt-set or analog phone in series with the line to accurately measure On-Hook (hung up) DC voltage. The On-Hook DCV should measure between 24 and 50 VDC.
3) Off-Hook DCV (Normally 5-15VDC)
To measure this, simply leave everything the same as above and take the handset off-hook (or switch your butt-set from monitor to talk) and read the measurement from your meter. The off-hook DCV should measure between 5 and 15VDC.
4) AC Ring Voltage (Normally > 75VACRMS)
To measure this, set your meter to AC Voltage. Make sure your probes are in the right positions (Common and Volts). You will need to know the phone number to the phone line you are taking the measurement on since the line needs to be ringing to measure Ring Voltage. Place one lead from your meter on Tip and the other on Ring and call the line. Your meter will scale up and down with the ring cadence. If your meter has a peak or max button put it in this mode because it will make it easier to take the measurement. If it doesn’t have a peak or max scale button, you will want to let it ring several times to try and get an estimate of where your meter is topping out at.
5) AC Ring Current (Normally 8.5 to 45maAC)
To measure this, put your meter on the AC ma scale. Make sure your probes are in the right positions (Common and Milliamps). Next you will need to document the Ringer Equivalence Number (REN) of the phone you are going to use as your test phone. This is usually marked on the bottom of the phone. For this example, we will say it has 1 REN. Put the meter leads in-series with either the tip or ring going to the phone. It must be in-series, not in parallel (which will short the line) to measure the current traveling to the phone. If you put the meter in-series with the tip, the current will come out the tip side of the phone line, in and out through the meter leads to the tip connected to the phone, through the phone and back to the ring side of the phone line. Call the phone line, and you'll see the current it takes to ring the phone you are using (attached in-series after the meter) displayed on your meter.
The reading you see will be the amount of current your meter reads for (X) REN, or 1 REN for our example. Record that number, because that's going to be the current for (X) REN that you're going to use to calculate the REN of phones attached to a phone line, or how much REN the phone line is capable of supporting.
To measure the REN of all the phones on a phone line, connect your meter in-series with all the phones, ring into the line and observe the ma reading on your meter. The more phones that are attached after the meter, the more ma (current) you'll see.
When you get the reading for all the phones, divide it by the reference number you recorded for (X) REN or 1 REN for our example. That's how much REN the phones are using on that phone line (like 20ma divided by 8.2ma = 2.43 REN) Your meter may show 8.75ma AC with a phone that has a REN of 1. If you put four 1 REN phones on the line and they all still ring, your meter would show 35.0 ma.
(6-8) On-Hook ACV (Normally < .5VAC)
To measure this, you will need to set your meter to AC voltage and put the probes in the correct place (Common and Volts). Since there should be almost no AC on a phone line (unless the line is ringing) you should get < .5VAC on these readings. Anything higher could cause problems with the phone line. Once you have your meter set up properly just put one lead on tip and the other on ring and read the display. You will also want to check Tip to Ground and Ring to Ground. All 3 of these measurements should be < .5VAC.

 Products